How to Document Memes on Bonkipedia
THIS PAGE IS CURRENTLY UNDER CONSTRUCTION AS WE ROLL OUT OUR NEW AUTOMATED MEME UPLOADER
Before Uploading Memes
NAFO creates hundreds of memes a week. The goal of Bonkipedia is to document as many of them as we can. Obviously that is too much for a small team, so we ask that users help us upload new memes to share with the community.
Please check if the meme has already been uploaded!
How to Make a New Meme Page
Step 0: Check if the Meme has Already Been Uploaded
Memes have to be titled to be searchable, and what someone else thinks the "name" of a meme is might not be what you think it is. Try various key words or check in the categories. This is why it is also very important to include key words on your page and categorize the meme in a way other people can find it.
Note: There are a few ways to create and edit pages on wikis, but this is the preferred way to keep pages consistent. You are welcome to create pages in another way, but please check that the text in Step 3: Edit Contents of Page is the same so the formatting works. The second reason to use the File Upload page separately is that it will notify you if the image has already been uploaded before.
Step 1: Upload File of the Meme
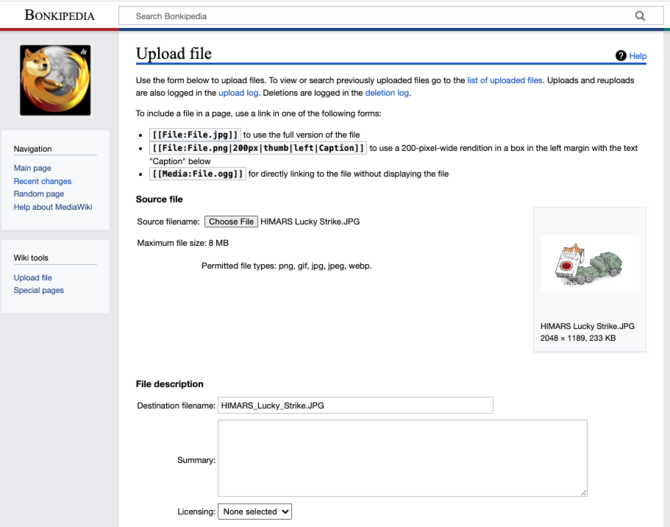
On the left-hand side of the screen, under "Wiki Tools" there is a link to the page to "Upload File". If you did not title the file prior to attempting to upload it, you can change the File Name under the File Description --> Destination filename. Keep the . extension (i.e. .png / .jpeg / etc). We recommend you title the file the name you want to give the meme, but this is not mandatory. Select "Upload File" to complete upload.
Step 2: Create New Page with Meme
Once your file has been uploaded, open a new tab with Bonkipedia and Search for the exact wording you want the title of the meme to be. This is hard to change later so please double check.
Since the page will not exist, click on the red text to create the page on this wiki. Note that pages are not created until you save edits to the new page.
Step 3: Edit Contents of Page
There are two types of editing in Media Wiki. We will be using both of them to create a meme page, so do the following steps in either order. If you need to switch tabs, select the pencil Icon at the top of the page next to the blue "Save Changes" button. You can also save changes and re-enter either editing function at the top of the page.
Editing in "Edit" Tab
This is where we install the "Meme" Template. Using a template allows us to control for consistency and change pages across the site quickly.
Editing in "Source Edit" Tab
[[Category:Meme]]
[[Category:HIMARS]]
[[Category:Smoking/Cigarette]]
At the top should be the Category list. This will only show up in the "edit source" side, which is why I recommend editing there. Every meme should have the category "Meme" so the complete list is captured. Beyond that, look in the Category:Meme Category superstructure to find an appropriate category. I recommend searching for similar memes on the site and checking what category they are under.
Lastly, add tags that are related to the image of the meme, the content of the meme, or anything you think people might use to find it. This is very important to help people find memes if they don't think of your title.
Meme Page Checklist
Every Meme Page MUST have the following information blocks:
- Categories (only seen on the "Edit Source" side of editing)
- Image of the Meme
- Title of the Meme
- Creator of the Meme (if unknown, put unknown. If you think you might know, put (??) in front of the name, and message that person to find out).
Optional
- Any additional context in the description (i.e. for historical references, what is the reference and why is it being cited)
- Additional comments from the creator (i.e. additional text from the tweet it was originally posted with)


